It’s a while since I’ve set a dare for the Daring Cardmakers but my turn has come round at last and I’ve decided to link it to Post Pals,
a charity I’ve been involved with for several years.
They are an organisation that was set up with the intension of sending cards, letters and post cards to children who have long term or terminal illnesses and it’s not until you go to their web site and read the children’s profiles that you realise just how much these children and their siblings suffer.
It must be so stressful for the families.
That’s why, when I’m cardmaking I like to make an extra one now and again to send to one of the children. All it costs me is the price of a stamp but it could make the world of difference to a sick child who needs to know someone is sending them love and thinking about them.
Well worth doing if you ask me!
So as I say, my dare this week is to make a card with a sick child in mind and send it to one of the children featured on the Post Pals web site………..simple!
I’ve use a pre coloured Digi Stamp on this card because the colours were a perfect match for the Crate Paper ‘Orbit’ Collection papers that I’ve used…..how lazy was that!

In my defence I did put a lot of extra work into the card to compensate, by adding lots of embossing, doodling and faux stitching.
 After I had made my card I had a read of some of the children’s stories.
 It makes difficult reading, I can say and it also made it very hard to choose just one child to send a card to. In hindsight, what I should have done is looked at the list first and made the card accordingly but I struck lucky when I came across a little boy called Jordan who likes anything to do with outer space, so it was perfect.
Jordan also has a sister so I decided to send her a card too.
There's blog candy up from grabs too because anyone who makes and sends a card to one of the children at Post Pals can enter the draw onAnn's blog, so why not join in. Not only will you be bringing a smile to a childs face, it could put a big smile on yours if you're lucky enough to be picked!
Card Blank – QVC Kit
Patterned Paper – Crate Paper (Orbit)
Digi Stamp – Digi Stamp Boutique (Out Of This World)
Inks –Ranger Distress Ink (Peeled Paint) Tsukineko StazOn (Black)
Dies – Sizzlets (Stars)
Embossing Folders – Cuttlebug (Spots& Dots, Tiny Bubbles)
Rubber Stamps – Studio G Alphabet Set
Pens – Sharpie (Black & White) Marvy LePlume (Green)
Glitter Glue – Stickles (Green) Craft Planet (Iridescent Sparkle)
Other BitsRibbon
Buttons
Green Embroidery Thread


 These two Flower fairy panels are a bit sentimental in a way because they were the first pieces of counted thread work that I ever stitched. The trouble was they were just sat in the drawer of my cabinet gathering dust for many years because I didn't really know what to do with them.


 The two Bunny panels were a special request, made to go some quilts that Nicki had already stitched.


 The Image was printed out and coloured with Prismacolor pencils and then decorated with glitter glue and tiny gems to glitz it up a bit.
.png) and three of the new My Minds Eye papers from Andrea Victoria with some added faux stitching and doodling.
and three of the new My Minds Eye papers from Andrea Victoria with some added faux stitching and doodling..jpg)

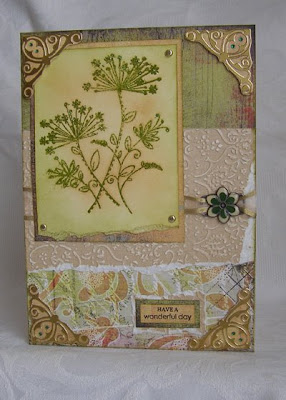 I don’t know if it’s the papers, the colours or the fact that I’ve used Gold Peel-Offs but something seems to be throwing the whole thing off and I’ve no time to do another one so this is going to have to do.
 I didn’t have any of the Cordinations papers either, so I’ve used Beige DCWV card stock that has a White core instead, so I hope that passes.
 When I started to think about my card I decided to make little plaques in each of the colours, which lead to a


 I printed them out twice and cut one up into the individual tiles. The other I cut some parts from so that I could layer then on 3D foam and I enhanced them with brads, Diamond Glaze and a button before mounting them on Navy scalloped squares cut with my Nestabilities.
.jpg)

 The scalloped border was dry embossed by hand onto Vellum, to which I’ve added tiny gems and ribbon before finishing off with some faux stitching.
 The medallion was cut from one of the papers and the three layers mounted on 3D foam.

